So you decide that the application is ready for prime time, it’s time to deploy them to production. Before that happens, let’s make sure everything is fine and dandy on the server side. Here a couple of steps that I usually do in securing tomcat deployment for production:
1. Secure the operating system
Runaway services
You can start by reviewing out services that are listening to incoming connection and which port they are using. See if something isn’t supposed to be there:
surfer@myoui:~$ sudo netstat -plnt
Active Internet connections (only servers)
Proto Recv-Q Send-Q Local Address           Foreign Address         State       PID/Program name
tcp        0      0 127.0.0.53:53           0.0.0.0:*               LISTEN      328/systemd-resolve
tcp        0      0 0.0.0.0:22              0.0.0.0:*               LISTEN      4735/sshd
tcp        0      0 127.0.0.1:631           0.0.0.0:*               LISTEN      18860/cupsd
tcp6       0      0 :::8080                 :::*                    LISTEN      3058/java
tcp6       0      0 :::22                   :::*                    LISTEN      4735/sshd
tcp6       0      0 :::8443                 :::*                    LISTEN      8152/java
tcp6       0      0 ::1:631                 :::*                    LISTEN      18860/cupsd
tcp6       0      0 127.0.0.1:8005          :::*                    LISTEN      3058/java
tcp6       0      0 :::8009                 :::*                    LISTEN      3058/java
We won’t be needing printing system, won’t we? Removing the service is as easy as
surfer@myoui:~$ sudo apt remove cups-daemon
And check whether the service is still listed or not
surfer@myoui:~$ sudo netstat -plnt
Active Internet connections (only servers)
Proto Recv-Q Send-Q Local Address           Foreign Address         State       PID/Program name
tcp        0      0 127.0.0.53:53           0.0.0.0:*               LISTEN      328/systemd-resolve
tcp        0      0 0.0.0.0:22              0.0.0.0:*               LISTEN      4735/sshd
tcp6       0      0 :::8080                 :::*                    LISTEN      3058/java
tcp6       0      0 :::22                   :::*                    LISTEN      4735/sshd
tcp6       0      0 :::8443                 :::*                    LISTEN      8152/java
tcp6       0      0 127.0.0.1:8005          :::*                    LISTEN      3058/java
tcp6       0      0 :::8009                 :::*                    LISTEN      3058/java
Configuring the Firewall
…And make sure the host’s firewall is configured accordingly. Since we are on ubuntu, I’m going to use ufw. To check whether ufw is running, do
surfer@myoui:~$ sudo ufw status
Status: active

To                         Action      From
--                         ------      ----
8443                       ALLOW       Anywhere
22                         ALLOW       Anywhere
8443 (v6)                  ALLOW       Anywhere (v6)
22 (v6)                    ALLOW       Anywhere (v6)
If ufw is disabled, you can enable the service by executing
surfer@myoui:~$ sudo ufw enable
This will also configure ufw to start everytime the server is booted. As you can see from the output above, while tomcat is running on both 8080 and 8443, we will only expose port 8443 since client connection will be through SSL only. To improve the server’s security, we can also configure ssh service to listen on a custom ports, and setup fail2ban to prevent DDoS. We can also configure the firewall to accept ssh connection only from specific IP or from internal network. My final firewall configuration kind of looks like this:
surfer@myoui:~$ sudo ufw status
[sudo] password for surfer:
Status: active

To                         Action      From
--                         ------      ----
8443                       ALLOW       Anywhere
2212 on enp0s3             ALLOW       Anywhere
8443 (v6)                  ALLOW       Anywhere (v6)
2212 (v6) on enp0s3        ALLOW       Anywhere (v6)
SSH is connection can now only be established on a port that is facing internal network
2. Removing the default
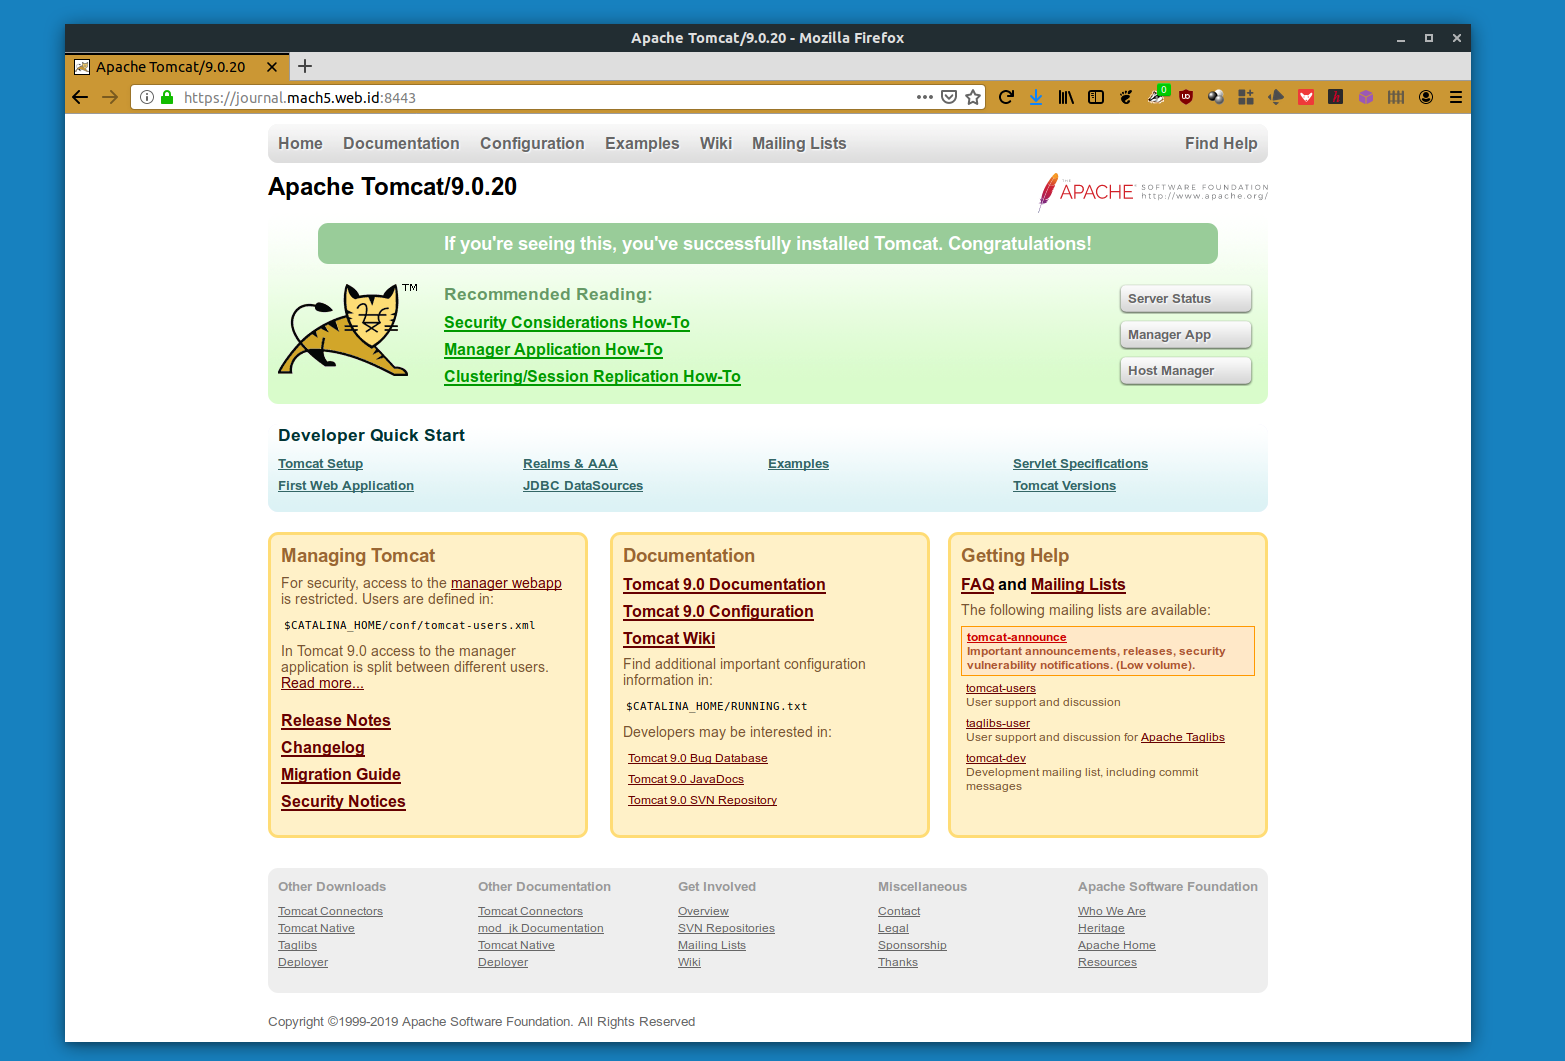
Removing the default Front page
First, the default front page. This is how tomcat looks the first time we load them after installation:

At the very least, the front page shows which version of tomcat is installed on the server. The page above is served from CATALINA_HOME/webapps/ROOT. What we can do is to remove all pre-built app on CATALINA_HOME
surfer@myoui:/opt/tomcat/current/webapps$ ls
ROOT  docs  examples  host-manager  manager
What I do is to remove everything aside from ROOT, and put a replacement index.html file inside ROOT that redirect away all hits to the root directory, such as
<html>
     <head>
         <meta http-equiv="refresh" content="0; url=https://www.youtube.com/watch?v=mAKsZ26SabQ" />
     </head>
</html>
Removing the default error page
Tomcat’s default error page also shows the version of tomcat that is running on the server

To mitigate this issue, customize Tomcat’s Error Report Valve to omit server version from the error page. Open and make some change on
surfer@myoui:~$ nano /opt/tomcat/current/conf/server.xml
We need to add the configuration on <Host>. You can do that by going to the very end of the file and add the Error Report Valve configuration right before </Host>
   <Valve className="org.apache.catalina.valves.ErrorReportValve"
          showReport="false"
          showServerInfo="false" />
</Host>
Save, and restart the service. The newly configured error page should now look like this:

3. Poking around the service
There are a lot of online resource that we can use to test out our configuration. Below are two that I use the most, a long with what to do to fix stuff they found on our server.
Immuniweb
Immuniweb rates how good our ssl configuration is based on several standard, including PCI-DSS compliance, HIPAA guideline, and other best practices. There a couple of stuff that
- Supported TLS versions. PCI-DSS has taken out support for TLS v1.0
- Preferred chiper. It’s a common best practice to configure TLS service to offer preferred chiper, to ensure the encryption is used.
GeekFlare tools
GeekFlare provides a couple of tools to test out our configuration, such as
- HTTP Strict Transport Security (HSTS) Header checker
- Cross Site Scripting checker
- Clickjacking attack
- MIME Sniffing test
..and a couple of other tests
4. Closing up those holes
After you’ve finished poking around the service that you’ve just recently erected, now is the time to close all of those holes you just discovered. Let’s start with the first config file
CATALINA_HOME/conf/server.xml
<Connector port="8443" protocol="org.apache.coyote.http11.Http11AprProtocol"
               maxThreads="150" SSLEnabled="true" >
        <UpgradeProtocol className="org.apache.coyote.http2.Http2Protocol" />
        <SSLHostConfig protocols="TLSv1.1+TLSv1.2"
            ciphers="TLS_ECDHE_RSA_WITH_AES_256_GCM_SHA384,TLS_ECDHE_ECDSA_WITH_AES_256_GCM_SHA384,
                       TLS_ECDH_RSA_WITH_AES_256_GCM_SHA384,TLS_ECDH_ECDSA_WITH_AES_256_GCM_SHA384,
                       TLS_ECDHE_RSA_WITH_AES_128_GCM_SHA256,TLS_ECDHE_ECDSA_WITH_AES_128_GCM_SHA256,
                       TLS_ECDH_RSA_WITH_AES_128_GCM_SHA256,TLS_ECDH_ECDSA_WITH_AES_128_GCM_SHA256,
                       TLS_ECDHE_RSA_WITH_AES_256_CBC_SHA384,TLS_ECDHE_ECDSA_WITH_AES_256_CBC_SHA384,
                       TLS_ECDHE_RSA_WITH_AES_256_CBC_SHA,TLS_ECDHE_ECDSA_WITH_AES_256_CBC_SHA,
                       TLS_ECDH_RSA_WITH_AES_256_CBC_SHA384,TLS_ECDH_ECDSA_WITH_AES_256_CBC_SHA384,
                       TLS_ECDH_RSA_WITH_AES_256_CBC_SHA,TLS_ECDH_ECDSA_WITH_AES_256_CBC_SHA,
                       TLS_ECDHE_RSA_WITH_AES_128_CBC_SHA256,TLS_ECDHE_ECDSA_WITH_AES_128_CBC_SHA256,
                       TLS_ECDHE_RSA_WITH_AES_128_CBC_SHA,TLS_ECDHE_ECDSA_WITH_AES_128_CBC_SHA,
                       TLS_ECDH_RSA_WITH_AES_128_CBC_SHA256,TLS_ECDH_ECDSA_WITH_AES_128_CBC_SHA256,
                       TLS_ECDH_RSA_WITH_AES_128_CBC_SHA,TLS_ECDH_ECDSA_WITH_AES_128_CBC_SHA"
             honorCipherOrder="true">
           <Certificate certificateKeyFile="conf/privkey.pem"
                        certificateFile="conf/cert.pem"
                        certificateChainFile="conf/chain.pem"
                        type="RSA" />
       </SSLHostConfig>
</Connector>
The configuration above will set the server to
- Remove support for TLS v1.0, and only support TLS v1.1 and v1.2, and
- Offer preferred cipher
CATALINA_HOME/conf/web.xml
<filter>
        <filter-name>httpHeaderSecurity</filter-name>
        <filter-class>org.apache.catalina.filters.HttpHeaderSecurityFilter</filter-class>
        <async-supported>true</async-supported>
        <init-param>
                <param-name>hstsEnabled</param-name>
                <param-value>true</param-value>
        </init-param>
       <init-param>
                <param-name>hstsMaxAgeSeconds</param-name>
                <param-value>6592000</param-value>
        </init-param>
        <init-param>
                <param-name>antiClickJackingEnabled</param-name>
                <param-value>true</param-value>
        </init-param>
        <init-param>
                <param-name>antiClickJackingOption</param-name>
                <param-value>DENY</param-value>
        </init-param>
        <init-param>
                <param-name>xssProtectionEnabled</param-name>
                <param-value>true</param-value>
        </init-param>
        <init-param>
                <param-name>blockContentTypeSniffingEnabled</param-name>
                <param-value>true</param-value>
        </init-param>
</filter>
<filter-mapping>
        <filter-name>httpHeaderSecurity</filter-name>
        <url-pattern>/*</url-pattern>
</filter-mapping>
The configuration above covers the HTTP Header configuration for:
- HTTP Strict Transport Security (HSTS)
- Anti Clickjacking, and
- Cross Site Scripting (XSS) Protection
Restart the service and see if you can pass those tests now.
Do you have anything to add? Drop a comment!